
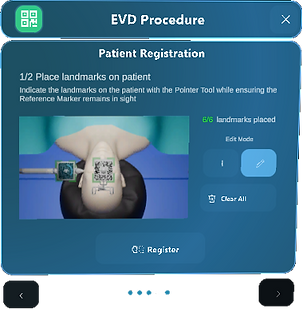
Place Anatomical Landmarks on Patient
-
Track the pointer tool and ensure the green outline correctly aligns with the real pointer tool
-
Indicate the landmarks on the patient with the pointer tool while ensuring the Reference Marker remains in sight
-
Tip: ensure to place the landmarks similar as you have planned them on the 3D patient, meaning the same landmarks and in the same order
-
-
Gaze at the marker on the pointer tool to place a landmark
-
Tip: enable the sound of your HoloLens, because a 'click' confirms that you successfully placed a landmark
-
-
Press Register when you successfully placed 6 anatomical landmarks on the patient
Options:
-
Pointer Mode: allows you to switch between adding landmarks and editting landmarks. In case you are in edit mode, use your hands to grab and replace or remove landmarks.
-
Clear All: remove all landmarks placed on the patient
Plan Landmarks on Patient

Verify Image-to-Patient Registration
-
Check the accuracy of the 3D patient overlay while keeping the Reference Marker in sight
-
Tip: you can check the overlay using 3 points of reference: the zygoma, the ears, and the top of the head
-
-
Press Accept in case you are satisfied with the image-to-patient registration
-
Press Restart if you want to restart the registration and edit or add patient landmarks